Spring Cloud 配置服务器
Spring Cloud Configuration Server 是一个集中式应用程序,它管理所有与应用程序相关的配置属性。 在本章中,您将详细了解如何创建 Spring Cloud Config Server。
创建 Spring Cloud Config Server 配置服务器
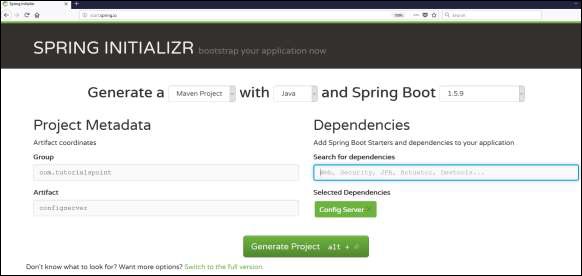
首先,从 Spring Initializer 页面下载 Spring Boot 项目并选择 Spring Cloud Config Server 依赖项。 观察下面给出的截图 −
现在,在构建配置文件中添加 Spring Cloud Config Server 依赖项,如下所述 −
Maven 用户可以将以下依赖项添加到 pom.xml 文件中。
<dependency>
   <groupId>org.springframework.cloud</groupId>
   <artifactId>spring-cloud-config-server</artifactId>
</dependency>
Gradle 用户可以在您的 build.gradle 文件中添加以下依赖项。
compile('org.springframework.cloud:spring-cloud-config-server')
现在,在主 Spring Boot 应用程序类文件中添加 @EnableConfigServer 注解。 @EnableConfigServer 注解使您的 Spring Boot 应用程序充当配置服务器。
下面给出了主要的 Spring Boot 应用程序类文件 −
package com.tutorialspoint.configserver;

import org.springframework.boot.SpringApplication;
import org.springframework.boot.autoconfigure.SpringBootApplication;
import org.springframework.cloud.config.server.EnableConfigServer;

@SpringBootApplication
@EnableConfigServer
public class ConfigserverApplication {
   public static void main(String[] args) {
      SpringApplication.run(ConfigserverApplication.class, args);
   }
}
现在,将以下配置添加到您的属性文件中,并将 application.properties 文件替换为 bootstrap.properties 文件。 观察下面给出的代码 −
server.port = 8888
spring.cloud.config.server.native.searchLocations=file:///C:/configprop/
SPRING_PROFILES_ACTIVE=native
配置服务器在 Tomcat 端口 8888 上运行,应用程序配置属性从本地搜索位置加载。
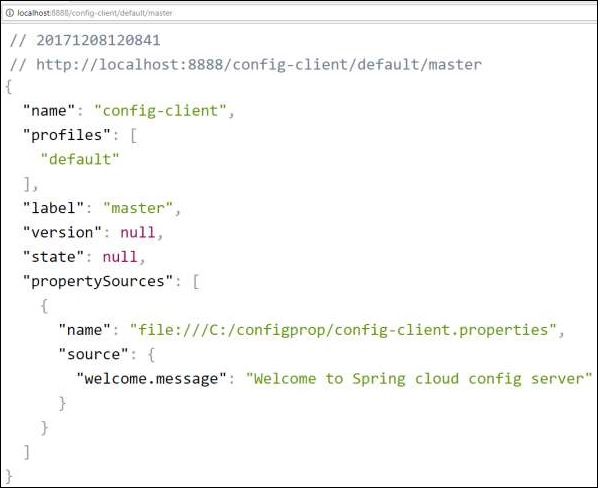
现在,在 file:///C:/configprop/ 中,放置您的客户端应用程序 - application.properties 文件。例如,您的客户端应用程序名称是 config-client,然后将您的 application.properties 文件重命名为 config-client.properties,并将属性文件放在路径 file:///C:/configprop/ 上。
config-client 属性文件的代码如下 −
welcome.message = Welcome to Spring cloud config server
完整的构建配置文件如下 −
Maven 用户可以使用下面给出的 pom.xml −
<?xml version = "1.0" encoding = "UTF-8"?>
<project xmlns = "http://maven.apache.org/POM/4.0.0"
   xmlns:xsi = "http://www.w3.org/2001/XMLSchema-instance"
   xsi:schemaLocation = "http://maven.apache.org/POM/4.0.0
   http://maven.apache.org/xsd/maven-4.0.0.xsd">

   <modelVersion>4.0.0</modelVersion>
   <groupId>com.tutorialspoint</groupId>
   <artifactId>configserver</artifactId>
   <version>0.0.1-SNAPSHOT</version>
   <packaging>jar</packaging>

   <name>configserver</name>
   <description>Demo project for Spring Boot</description>
   <parent>
      <groupId>org.springframework.boot</groupId>
      <artifactId>spring-boot-starter-parent</artifactId>
      <version>1.5.9.RELEASE</version>
      <relativePath/> <!-- lookup parent from repository -->
   </parent>

   <properties>
      <project.build.sourceEncoding>UTF-8</project.build.sourceEncoding>
      <project.reporting.outputEncoding>UTF-8</project.reporting.outputEncoding>
      <java.version>1.8</java.version>
      <spring-cloud.version>Edgware.RELEASE</spring-cloud.version>
   </properties>

   <dependencies>
      <dependency>
         <groupId>org.springframework.cloud</groupId>
         <artifactId>spring-cloud-config-server</artifactId>
      </dependency>
      <dependency>
         <groupId>org.springframework.boot</groupId>
         <artifactId>spring-boot-starter-test</artifactId>
         <scope>test</scope>
      </dependency>
   </dependencies>

   <dependencyManagement>
      <dependencies>
         <dependency>
            <groupId>org.springframework.cloud</groupId>
            <artifactId>spring-cloud-dependencies</artifactId>
            <version>${spring-cloud.version}</version>
            <type>pom</type>
            <scope>import</scope>
         </dependency>
      </dependencies>
   </dependencyManagement>

   <build>
      <plugins>
         <plugin>
            <groupId>org.springframework.boot</groupId>
            <artifactId>spring-boot-maven-plugin</artifactId>
         </plugin>
      </plugins>
   </build>

</project>
Gradle 用户可以使用下面给出的 build.gradle 文件 −
<scope>import</scope>
</dependency>
</dependencies>
buildscript {
   ext {
      springBootVersion = '1.5.9.RELEASE'
   }
   repositories {
      mavenCentral()
   }
   dependencies {
      classpath("org.springframework.boot:spring-boot-gradle-plugin:${springBootVersion}")
   }
}
apply plugin: 'java'
apply plugin: 'eclipse'
apply plugin: 'org.springframework.boot'

group = 'com.tutorialspoint'
version = '0.0.1-SNAPSHOT'
sourceCompatibility = 1.8

repositories {
   mavenCentral()
}
ext {
   springCloudVersion = 'Edgware.RELEASE'
}
dependencies {
   compile('org.springframework.cloud:spring-cloud-config-server')
   testCompile('org.springframework.boot:spring-boot-starter-test')
}
dependencyManagement {
   imports {
      mavenBom "org.springframework.cloud:spring-cloud-dependencies:${springCloudVersion}"
   }
}
现在,创建一个可执行的 JAR 文件,并使用以下 Maven 或 Gradle 命令运行 Spring Boot 应用程序 −
对于 Maven,使用下面给出的命令 −
mvn clean install
在“BUILD SUCCESS”之后,您可以在目标目录下找到 JAR 文件。
For Gradle, use the command given below −
gradle clean build
在“BUILD SUCCESSFUL”之后,您可以在 build/libs 目录下找到 JAR 文件。
使用以下命令运行 JAR 文件 −
java –jar <JARFILE>
现在,应用程序已在 Tomcat 端口 8888 上启动,如下所示 −

现在在您的 Web 浏览器上点击 URL http://localhost:8888/config-client/default/master,您可以看到您的配置客户端应用程序配置属性,如下所示。